26 November 2010

Pink Pecan Pie Macarons

"What does Fall mean to you?... Does fall mean Thanksgiving, or deep cinnamon flavour, are apples your calling or do falling leaves announce the season to you? Or then, is it the warm comfort and luxury of hot cocoa or warm spiced cider?"
-Mactweets


l'Automne.  Quite simply my favourite season of the year, when the river valley is an explosion of reds and golds, and the sunny but crisp days mean I get to spice up my wardrobe with my collection of scarves.  I love taking the pups for a walk in the park, hearing the leaves crunching under our feet.  Fall is also when many of my favourite foods come into season, like figs, pomegranates, apples, and persimmons.  It's also the perfect time of year to enjoy one of my favourite desserts... Pecan Pie!

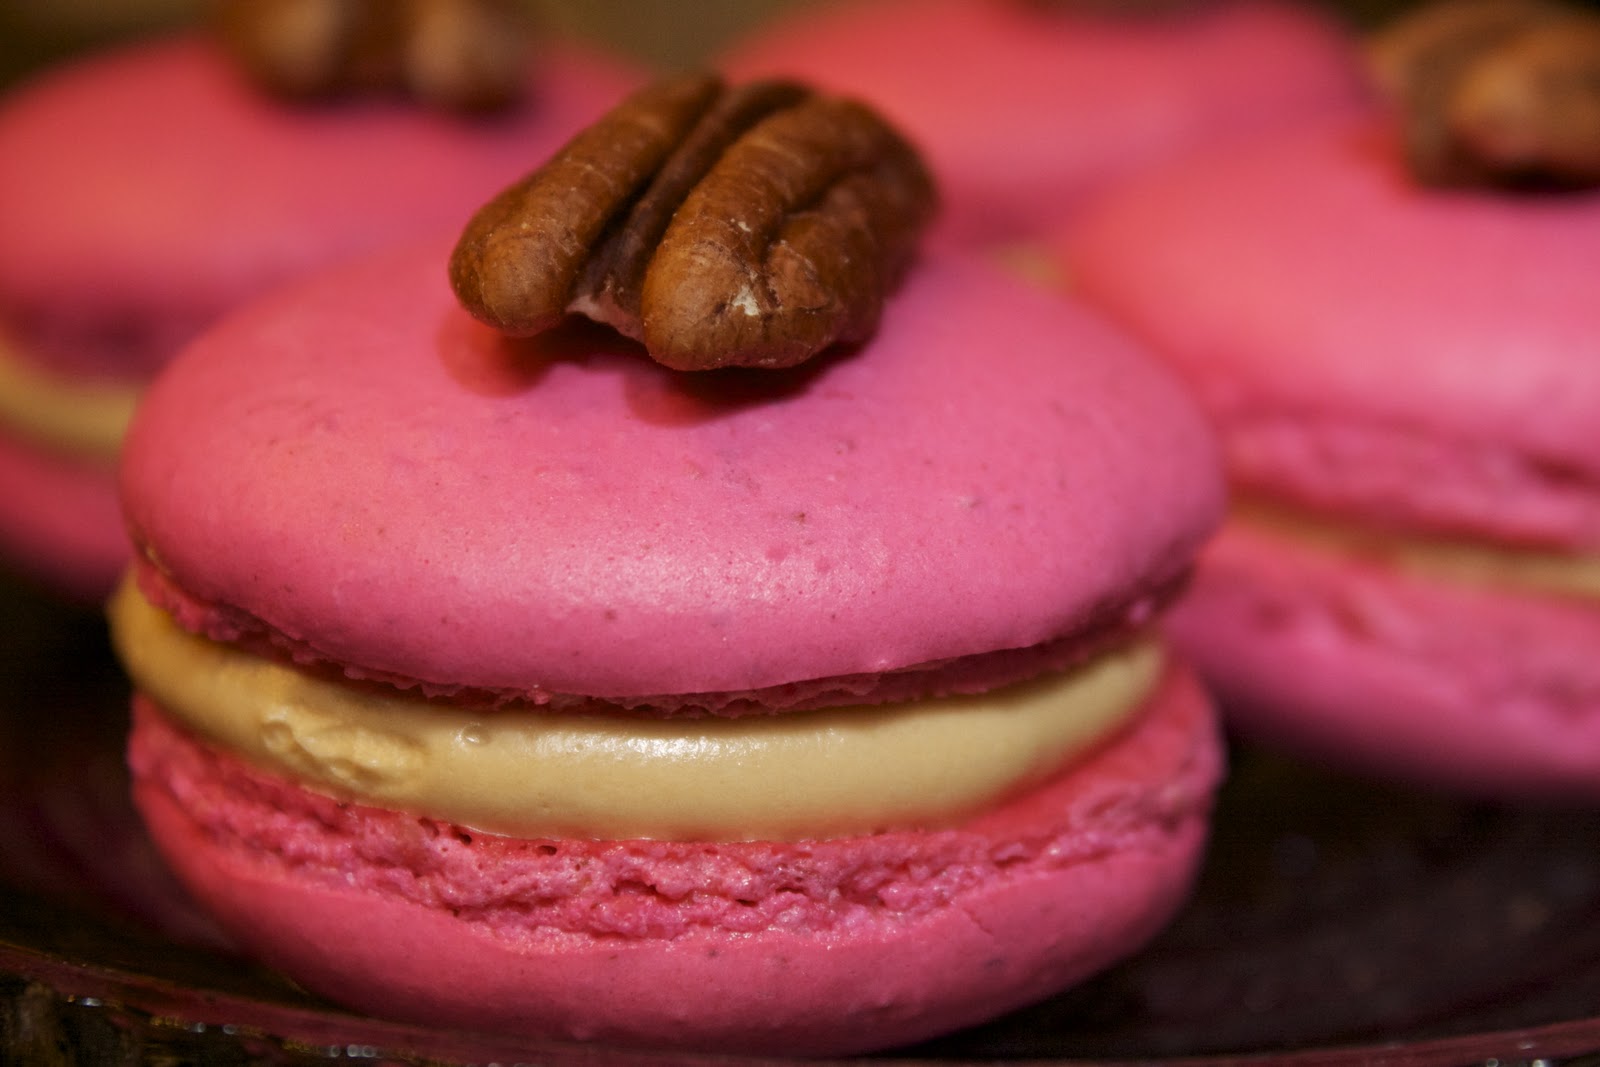
With so many fall friendly flavours to choose from, it was difficult to narrow my macaron inspiration to just one, but I was curious to see if I could recreate the flavours of my beloved pecan pie in macaron form.  And from the endless flavour varieties I have heard of for macarons, I don't believe I have ever heard of a pecan version at all, though their sweet flavour would certainly pair well with the almond-meringue batter.  And hey - even their pink shells are good inspiration.  Whoa.  Wait wait wait wait... turns out their shells are dyed pink.  What the heck is up with that? And how is it that I am just figuring that out now?  I thought we were getting past all of that!  I haven't seen the scorching hot pink coloured pistachios of my youth since... well, my youth.  Of course I still can't figure out why cheddar cheese is orange here, yet most true cheddars are actually a pale buttery yellow colour.  I thought we were supposed to be getting away from  putting artificial colours and flavours into everything.   Of course, maybe that argument's best saved for a post when I'm not talking about day-glo pink cookies.... hmmmm that's awkward....


Since last month's major macaron fail, I made sure to clear my evening to focus on my baking, and I also turned to the previously successful Italian-meringue (a.k.a. Pierre Hermé) method.  Speaking of which - did I mention that I finally have my very own copy of Pierre Hermé Macarons? WOOHOO!!

To capture the pecan pie flavour, I swapped out a third of the almond meal for pecans, which I toasted before grinding them finely in the food processor.  Toasting nuts really brings out their flavour, and I definitely wanted noticeable pecan taste.  I sieved these in with the confectioner's sugar and almond meal before adding the liquid egg whites and the Italian meringue.  I blended in a very generous dose of rose food colouring, pushing myself not to woos out by remembering previous unappetizingly flesh-coloured macarons.   It really paid off.  Bright, colourful mac shells were soon pulled from the oven.  Now to focus on the filling...
Pecan pie has more of a syrupy kind of flavour, but I thought that a caramel au beurre salé would likely pair well with the pecaniness, and still not overpower the flavour. I was a little worried that the buttercream would look to orangey against the hot pink shells, but it watually turned out really well. To tone down some of the strong caramel flavour, I added some honey in place of the actual caramel sauce, as well as adding just a sprinkling of salt to he mixture to counter-act any light bitterness that might rear it's ugly head. The final cookie turned out almost as well as I could have hoped. The pecan wasn't quite as noticeable once the cookies were assembled, but overall, they were excellent. Not to mention the fact that they all had their little feet, and turned out beautifully. Hooray!! Macaron success!


Pecan Macarons with Caramel au Beurre Salé buttercream
makes approximately 36 cookies, but is easily doubled 
adapted from Pierre Hermé Macarons

100g almond flour
50g, toasted pecans, finely ground
150g confectioners sugar
55g egg whites
~
150g granulated sugar
37g water
55g egg whites (yes, another 55g of egg whites in a separate bowl)
1/2 tsp food colouring

Prepare two cookie sheets with parchment paper and set aside.
Using a fine mesh sieve, sift the almond flour and confectioners sugar together into a large bowl.
In a small bowl, mix the food colouring with the first 55g of egg whites. Stir the coloured eggs into the almond sugar mixture until well combined and set aside.
In the bowl of standing mixer fitted with a whisk, whip the second bowl of plain egg whites until they are foamy but do not yet hold a peak. Turn off the mixer and prepare the syrup:
Pour the water into a small saucepan, and pour the sugar into a mound the centre of the pot, but do not stir.
Place the pan over medium high heat, and keep your thermometer handy.
As the sugar begins to dissolve, gently and carefully swirl the mixture around to distribute any sugar that has not yet melted.
Once the syrup begins to boil, periodically check the temperature until it reaches 115˚C (239˚F).
Remove the pan from heat and check the temperature again - the syrup will continue to cook.
When the mixture reaches 118˚C (244˚F), turn the mixer up to medium speed and carefully pour the hot syrup into the egg whites in a steady stream.
Once all of the syrup has been added, turn the mixer to medium-high and whip for another 2 minutes until the meringue is glossy and holds stiff peaks.
Using your thermometer, check the temperature of the Italian meringue - it should register about 50˚C (122˚F) or slightly cooler.
Fold the meringue into the coloured almond mixture until no white streaks remain, and has a consistency similar to cake batter.
Fill a piping bag with the macaron batter and pipe small rounds onto the prepared baking sheets.
Preheat the oven to 350˚F and place rack in the centre of the oven.
Allow the piped cookies to rest at room temperature for 30 minutes to form a dry "skin" while the oven comes to temperature.
To make sure the cookies are ready to bake, gently touch one with your finger, if any batter sticks to your finger, they are still too wet. You should be able to lightly press your finger to the top and have it come up clean.
Bake one sheet at a time, for 12 minutes. You should have nice puffy macaron shells with the loveliest feet you have ever seen. Remove them from the oven and allow them to cool.

Caramel au Beurre Salé buttercream
makes enough to fill more than 36 cookies, but is easily doubled
adapted from Pierre Hermé Macarons

165 ml crème fraiche or heavy whipping cream
100g granulated sugar
30g salted butter + 140g salted room-temperature butter
15ml honey

In a small pan, heat the crème fraiche (or cream) but do not allow it to boil.  In a separate, heavy-bottomed saucepan, heat 50g of the sugar and allow it to melt.  
Then in 3 different additions, add 50g more sugar to the pan and allow it to fully melt and caramelise until it turns a medium amber colour.  
Once the sugar reaches the right colour, remove the pan from heat and add in the 30g of salted butter, whisking  very gently until the butter is melted and fully incorporated.  Then the hot creme.  
BE VERY CAUREFUL, as the caramel will boil up and sputter, and sugar burns are super painful.  Gently whisk in the creme, then pour the caramel into a shallow, heatproof container and allow it to cool until it reaches 108˚F or cooler.
In the bowl of a standing mixer fitted with a whisk attachment, cream the remaining 140g butter.  With the mixer on high speed, carefully pour the caramel sauce in a thin, steady stream down the inside of the bowl so as to avoid getting splashed.  Once the caramel is fully blended, continue to whisk for another 2 minutes until the buttercream is slightly fluffy.
Fill a piping bag with the finished buttercream.

On a clean work surface, turn the macaron shells upside down.
Pipe buttercream onto half of the upturned shells.
Top each filled shell with an empty cookie shell and refrigerate for 24 hours.
Remove from the fridge about 2 hours before serving.

07 November 2010

Awww NUTS.... here we go again!

delicately sweet Cashew Butter Cookies

It's kinda funny.  As a kid, I would not have classified myself as a nut lover.  Sure, I enjoyed my fair share of peanut butter on toast or in PB and banana sandwiches, but nuts in their non-butter form, not so much.  Even then, nuts of the non-peanut form were pretty much a rarity (ya ya, I know - peanuts are not "technically" nuts, whatever).  I remember sitting with my Grandpa, while everyone gathered in the living room to watch a football game, and eating roasted peanuts.  By now you've probably caught on to the fact that I have my quirks - and I was even quirkier as a kid.  You know how when you take a peanut and split in half, one of the halves has this teeny tiny extra bit on the tip of it?  C'mon, you know... this part:

my peanut has a thingy
...ok, well, being a very lovable and quirky kid, I refused to eat that part.  I would carefully crack apart each little peanut, gently remove that little thingamabob and my dear Gpa would chuckle at me and eat the thingamabob so I didn't have to.  Have I mentioned how my Gpa was the best?

(by the way, turns out the thingamabob is the "embryo"... good thing I didn't know that as a kid, or I'd have been scarred for life! I don't recall exactly how old I was when I discovered what eggs actually were.)

As years passed, I would be introduced to many other nuts, and today my pantry always has a nutty assortment of nuts to bake with or snack on.  I almost always buy them raw, and toast them myself - think of it as quality control.  With so many nuts in my pantry, it stands to reason that they'll end up in some baked goods, right?

My last nut-themed experiment produced some lovely Almond Butter Cookies that were pretty darn good.  This got me thinking about the various types of nut butters that are readily available at my local grocery store and figured that if Almond Butter Cookies turned out so well, surely Cashew Butter Cookies would be just as lovely.  Well, I was wrong - they are simply delightful and put Almond Butter Cookies to shame.  They have a delicate sweetness to them, a distinct nuttiness, and just the right amount of chewiness.  I took a batch over to a friend's last night and came home with an empty plate.  Yup, the test batch were a hit.

The recipe is the same one I used for the Almond Butter Cookies, but with cashews and cashew butter subbed in where the recipe calls for "Almond".  However, since I have yet to even hear of a Cashew Extract for flavouring,  I just used a generous dose of vanilla.  When I gave the cookie batter an initial taste, it seemed a bit "flat", kind of one-dimensional, so I grabbed a bottle of my favourite honey and added a generous squirt.  Bingo - it was exactly what the cookies were lacking!  Scooped out onto a cookies sheet and topped with a whole cashew, they bake up in just 12 minutes.  That said, they are very delicate when they first come out of the oven, so they need at least another five minutes (as much as 10 minutes if you can wait that long) on the cookie sheet to cool, before you can transfer them onto a cooling rack or plate.

big beige cookie...


Though they tasted great, they looked awfully beige, so before popping the second cookie sheet into the oven, I sprinkled some chocolate flakes overtop - not a lot, just enough to break up the beige.   Even though each cookie had less that 1/4 tsp of chocolate on it, it was just enough to add another dimension of flavour to these already scrumptious cookies.  Now they were really fabulous.  Problem is, those little chocolate flakes are hard to find, so they're not going to be in every gal's pantry.  I obsessed over finding these unusual decorations after devouring them on my first Sprinkles Cupcake while visiting my sis a couple of years ago .  I searched for several weeks before I managed to locate some though King Arthur Flour, but I can't find them on their site anymore.  They're not your average chocolate sprinkle or "jimmy", they're little squares, they're from Italy, and they contain only three ingredients: sugar, chocolate liquor and cocoa butter.

Dark Chocolate Flakes

So, what should you use instead?  I'd recommend that you grab a bar of your favourite dark chocolate, a microplane grater and sprinkle a few shavings over each ball of cookie dough... that should get you pretty close to the same result.


beige before....
what better than chocolate to add some personality

So, I hope you'll give this recipe a try and let me know what you think!

Happy Baking!

Julia's Cashew Butter Cookies
Makes 48 cookies


Ingredients:
355g (2 1/2 Cups) flour
1/2 tsp baking soda
1/2 tsp baking powder
3 tsp kosher salt (half this amount if using table salt)
226 g (1 Cup) unsalted butter, at room temperature
220g (1 Cup) light brown sugar
201g (1 Cup) granulated sugar
320 g (1 Cup) unsalted Cashew butter, at room temperature
2 large eggs, room temperature
2 tsp vanilla extract
1 1/2 Tbsp good quality liquid honey
140g (1 Cup) whole cashews - unsalted, plus extra whole nuts for garnish
50g good quality dark chocolate *optional, but recommended

Directions:
Preheat oven to 300˚F and place rack in centre of oven.  Line 2 baking sheets with parchment paper and set aside.
In a skillet, gently toast the whole cashews, being careful not to burn or scorch them.  
As soon as they are toasted, remove them from the pan and allow them to cool on a plate or wooden cutting board.  
the best way to chop nuts
Coarsely chop the cashews, either with a sharp knife (recommended), or with a food processor, using short 1-second pulses - just make sure to leave them quite coarse).  Set aside.
In a medium bow, whisk together flour, baking soda, baking powder, and salt.
In the bowl of a stand mixer fitted with the paddle attachment, cream together the unsalted butter and both sugars until well combined.   
Beat in the cashew butter until fully incorporated.  
Add the eggs, one at a time, along with vanilla and vanilla extract and honey.  Mix the batter well, scraping down the bowl as necessary to make sure everything is fully incorporated.
Gently mix in the dry ingredients until just a few streaks of flour remain.  
Finally, add the chopped cashews and mix until the nuts are well dispersed.
Using a small scoop (a #70 or 35mm disher is my stand-by for cookies), scoop heaping tablespoonfuls if dough onto prepared cookie sheet, allowing about 1 1/2 inches of space between.  
Gently press a whole cashew into the top of each cookie, flattening the cookies a bit as you go.
Sprinkle some finely grated chocolate shavings over each cookie if you please.
Bake until cookies are puffy and golden around the edges, about 12 minutes.
Cool cookies on cookie sheet until they set up, at least 5 minutes, then transfer to wire rack to cool completely (about 10 minutes), as these cookies are really soft until the are fully cooled.

I have no idea how long these will "keep" for - they keep getting eaten before I can find out. 

04 November 2010

It's all about the cream

I recently mentioned the amazing Strawberry Panna Cotta hubby and I enjoyed on a day trip to Sausalito, and the memory seems to be a strong one, 'cause I cannot seem to get it out of my mind.  It was creamy and delicately sweet, surprisingly thick yet not heavy or overly rich.  For a girl who misses UK double cream like I do, it was heaven on a spoon.  So it's no surprise that, upon returning home from our mini vacation I immediately began looking at recipes for this lovely italian custard.

I located a few recipes, but they were all pretty similar, so I decided to try the one in the Larousse Pâtissier app I recently downloaded onto my iPad (if you've ever met me in person, you probably know that I'm a huge Mac lover, and proud of it.  I have never owned a PC and never intend to, a decision that is reinforced every day when I'm forced to use one at work - but I'm getting off topic).  Panna Cotta is one of those great 15-minutes-or-less recipes that you can whip up without breaking a sweat.  That said, you do need to make it well in advance of your serve time, because it needs a few hours of chill and set time in the fridge before you serve it.  Great for those times, say, when you have friends coming for dinner tomorrow night and only a million things to do before then.  It's elegant and indulgent and takes very little effort - and who doesn't love that?  Oh, did I mention that you can make it in just about any flavour you want?


To take advantage of every last bit of summer fruit, I decided to make a flavoured panna cotta with ripe nectarines and a few leaves of fresh basil.  OK, so it's not exactly your most common flavour combination, but the flavour of fresh basil really does pair beautifully with the tart juiciness of nectarines.  Normally, the sugar would be mixed in with the cream and the mixture would be heated before blending in the gelatine and vanilla.  For this version, however, I sprinkled the sugar and a pinch of salt over the sliced fruit and basil, and allowed it to draw out the juices and amp up the flavours while I soaked the gelatine sheets, and warmed the cream.  From there, it's a very simple matter of gently mixing the three components together and pouring the mixture into small molds to chill and set. 

Now, about the gelatine.  Gelatine sheets can be very tricky to find where I live, whereas the envelopes of powdered gelatine is on every grocery store shelf.  You can certainly substitute the powdered kind for the sheets if you need, but then you need to sprinkle it over the cold cream before you heat it, so the gelatine can "bloom".  Personally, now that I've gotten my hands on sheet gelatine, there is no turning back.  Of course I have yet to try using agar-agar, the vegetarian-friendly seaweed based gelatine flakes, which are incredibly hard to find in town, and when I did manage to find some at a specialty store, I nearly fell over from sticker shock (I'll try it next time, though, and let you know the results).

As with most (if not all) desserts, really good quality vanilla and a pinch of salt are a must.  In a case like this where there are only a very few ingredients, you can't cheat on quality.  Fresh, ripe fruit, fresh basil leaves, and buy the very best heavy cream you can find.  Or better yet, make it with crème fraiche - the thick and velvety quality will make this dessert toe-curling-ly divine.  

Nectarine Basil Panna Cotta
serves 4

1-2 tsp neutral-flavoured vegetable oil, such as canola or grapeseed
2 sheets gelatine or 2 pkgs powdered gelatine
1 nectarine, skinned and chopped
5-6 leaves fresh basil, medium sized leaves
250ml (1 Cup) heavy cream or crème fraiche
50g (1/4 Cup) sugar
1/4 tsp kosher salt
1 whole vanilla bean or 1 tsp vanilla bean paste

Fill a medium bowl with cold water, and soak the gelatine sheets for about 10 minutes.  Conveniently, this is how much time you will need to prepare the rest of the recipe.
In a medium saucepan, place the chopped nectarine and the fresh basil - be sure to "bruise" or crush the leaves in order to release more of the flavour.  Sprinkle the sugar and salt over the fruit and allow it to sit for a couple of minutes.
Lightly brush a thin coating of oil into 4 small ramekins or cups that you will be using for molds.  Be sure to get into all the nooks and crannies, so that the custards will unmold properly.
Add the vanilla and cream to the saucepan with the fruit mixture, and place over medium low heat until the mixture is hot and steaming, but do not allow it to boil.  Remove the pan from heat and carefully fish out and discard the basil leaves.
Remove the gelatine sheets from the cold water, and gently whisk them into the hot cream mixture.  As soon as the gelatine has fully dissolved, pour the custard into the molds, evenly distributing the fruit amongst the dishes.
Transfer the dishes to the refrigerator for 4-6 hours, or overnight.
When ready to serve, carefully run a very thin-bladed knife around the edge of the ramekin, and turn the custard out onto a small plate.
Serve immediately.