Showing posts with label ginger. Show all posts

18 January 2011

Gingerbread with Caramel Sauce - and change....


It's fairly obvious that I have been an absentee blogger lately, but I do have my reasons. Or excuses at least... The holiday season was a busy for hubby & I (like it is for 99.9% of the rest of the world), but then throw into the mix the preparations for a month-long trip through Europe and wrapping up parts of one life so that a new one can begin. You see, a little over a year ago, right around the time that I began this little blog of mine, I also reached the breaking point with certain parts of my life. Mainly, it boils down to location, location, location, but also, various parts of my life that this location impacts my life. So, my darling hubby & I have been preparing to make a major change, pack up the dogs and move to Europe! As you can imagine, preparing for a change like that takes up just a teeny bit of time.... anyway, while I still remain committed to this blog o' mine, and you, my loyal readers, I've also started a second blog. Journey for a Better Life will focus on my travels through Europe and our life-changing move, and all of the joys and headaches that will inevitably be a part of the process. Here at Always Leave Room for Dessert, however, the focus will remain my passion for FOOD!

So, what have I been baking lately? Well, in all honesty, the Christmas season had me baking almost non-stop, but they were all treats you have read about before; Coconut Cake, Sticky Toffee Pudding, Nutella Biscotti, and Macarons-a-plenty. But I did return to an old favourite of mine for New Year's Day dinner with the in-laws, and that is my Gingerbread with Caramel Sauce.

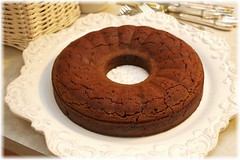
This is a lovely cake to serve at the end of a meal - even a big meal. It seems like it would be a heavy dessert, but it's really not, and it is wayyyy better than the overly sweet gingerbread cake desserts you see in some restaurants. This Gingerbread is moist and tender and has a lovely real-ginger flavour. Serve it warm, with a drizzle of rich caramel sauce and a spoonful of whipped cream, and you have yourself a perfect winter dessert. It's like coziness on a plate.

Gingerbread with Caramel Sauce
Serves 10-12
Adapted from Cook's Illustrated

Ingredients
320 g (2 1/4 Cups) all-purpose flour
1/2 tsp baking soda
1 1/2 tsp kosher salt
1 tsp cinnamon
1/4 tsp ground cardamom
3/4 tsp freshly grated nutmeg
1/2 tsp ground cloves
1/2 tsp ground allspice
1 tsp cocoa powder
40 g candied ginger, minced
120 g unsalted butter, melted
250 ml (3/4 Cup) molasses (choose one that's not too dark or bitter)
150 g (3/4 Cup) granulated sugar
1 large egg
120ml (1/2 Cup) buttermilk
120ml (1/2 Cup) whole milk


Adjust oven rack to middle position and heat oven to 350˚F. Prep a bundt pan with butter and flour, or with a non-stick baking spray.
In a medium bowl, whisk together flour, baking soda, salt, cinnamon, cardamom, cloves, nutmeg, allspice, and cocoa. Toss in the candied ginger and toss to combine
In the bowl of a stand mixer, fitted with the paddle attachment, cream the butter and sugar until light and fluffy. Add in the molasses, and mix well until combined, scraping down the bowl as necessary. Beat in egg until incorporated. Gradually add buttermilk and milk until combined.
Add dry ingredients to liquid; beat on medium speed until batter is smooth, about 1 minute, scraping down sides of bowl with rubber spatula as needed. being careful not overmix. Scrape batter into prepare bundt pan, and distribute the batter evenly, using an off-set spatula.
Bake until top springs back when lightly touched, 35-40 minutes.
Transfer pan to wire cooling rack and let cool 5 to 10 minutes. Serve warm, with a drizzle of caramel sauce and a dollop of lightly sweetened whipped cream.

Caramel Sauce

INGREDIENTS
120 ml (1/2 Cup) water
200 g (1 Cup) granulated sugar
120 ml (1/2 Cup) heavy cream
1/4 tsp kosher salt
1/4 tsp vanilla extract
15 g (1 Tbsp) unsalted butter, cold

Directions
Pour the water into a medium heavy-bottomed saucepan; add sugar to center of pot to keep granules from adhering to sides of pot. Bring to boil over high heat, covered. Uncover pot, insert candy thermometer, and continue to boil until syrup is thick and straw-colored, registering 300 degrees on candy thermometer, about 15 minutes. Reduce heat to medium; continue to cook until sugar is amber, and just barely begins to smoke - registers 350˚F on candy thermometer, about 5 minutes longer. Meanwhile, when temperature of syrup reaches 280˚F, bring cream and salt to simmer in small, heavy-bottomed saucepan over high heat. Remove from heat and set aside until the sugar reaches 350˚F.
Remove sugar syrup from heat. Pour about one quarter of hot cream into sugar syrup; let bubbling subside. Add remaining cream; let bubbling subside. Whisk gently until smooth; whisk in butter. Let cool until warm; serve.

27 October 2010

Macaron Fail

For the past couple of months, I have been a bad MacTweet-er.  I have missed not one but two challenges in a row - not because I've wanted to, but because hubby and I have been busy putting in some new flooring and putting a fresh coat of paint on a few rooms.  The downstairs portion of our house is looking pretty great now, and Molly and Riley are quickly learning they can't quite corner as fast on wood floors as they can on carpet (I'm pretty sure we're going to have to heavily pad the landing on the stairs when we finish them next).  Anyway, I'm back now, and am ready to get back to making macs!

...problem is, the Macaron gods seem to be a bit peeved with me.  Yep, that's right.... macaron FAIL!  Consider it Karma.


This month's MacTweets challenge was to create Pinkarons for Pinktober, in honour of October being Breast Cancer Awareness Month.  This cause is important to me not only as a woman, but as a woman who has seen friends and loved ones touched by this tragic disease.  The importance of self-exams and mammograms cannot be stressed enough, as early detection is currently our best defense.

So I decided to make Pink Ginger Macarons by adding a bit of ginger syrup to the macaron batter, and then made a chocolate ganache loaded up with the a sassy kick of ginger.  Even though I'm not much of a drinker, when a friend recently told me about an incredible ginger cognac liqueur, I knew I needed to get a bottle for my baking.  Either sipped at the end of a meal, or stirred into a bowl of melted dark chocolate, it is absolutely intoxicating, though it seemed to lose a bit of its pungency in the ganache.  That was quickly and easily rectified by grating a knob of fresh ginger over the bowl and incorporating all the spicy fresh ginger juice and pulp.  In no time, we had a killer filling for our lovely pink macs.  Unfortunately, "lovely" isn't quite what I ended up with this time.

After the success I had last time I made macarons, I knew I had to stick to using the Pierre Herme Italian meringue method.  I'm quite sure they would have turned out just fine if I had been focused on my macarons and nothing else, but as you can probably guess, such was not the case.  No, I was simultaneously working on dinner for hubby and a friend while trying to make finicky french cookies (seemed like a good idea at the time).  As time for the macaron process ran out, I had no choice but to put the batter into a piping bag, seal it up and set it into the fridge until the following day.  I figured this wouldn't be a problem, as Ken at HungryRabbitNYC had used a refrigerated batter for a previous month's challenge with spectaular results... what could possibly go wrong?  Well, for starters, his macs weren't made with the already thick Italian meringue.  When day two arrived and I finally had the time to devote to piping, drying and baking mon petit macarons, I was getting hand cramps just trying to pipe the batter onto the cookie sheets.  I walked away several times, partly out of frustration, but mostly to let the batter warm up a bit and make for easier piping.  An hour and an half later, I had three sheets filled with bright pink dots.  Only the dots were bumpy.  They were lumpy.  They were ugly.  I gave the ol' "rap the cookie sheets on the table sharply a couple of times" trick a go, but there was no improvement.  Finally, after waiting and speculating different fixes,  I grabbed a small spoon and a bowl of water and attempted to "smooth" the tops down a bit - they needed to at least *look* like macs, instead of pimply pink Hershey's Kisses.  I let them dry for a full 45 minutes before I baked them, but the fact of the matter is they were simply destined to be ugly macs.  When they finally came out of the oven, any happiness I felt over the success of having feet, was quickly over shadowed by the fact that my bright pink macs were now unmistakably flesh-coloured.  Pink Ginger macs had become Soylent macs in a matter of minutes.... not at *all* what I was going for. 


And, in case you were wondering...yes, they were also still bumpy and disfigured; thanks to the wet spoon trick, any water that hadn't completely dried before they went into the oven became a volcano-like vent for the hot batter to bubble up through and collect, giving a glimpse into what macarons may look like if they're not allowed to dry before baking.  Disappointed and defeated, I set the lumpy bumpy shells aside to be filled later.

But later never really came, at least not for these shells.  They were so unappetizing that I didn't even want to serve them to anyone.  So, into the food processor they went, to ground up and be mixed into meringue another day, hopefully reincarnated as the beautiful macarons they were meant to be.

As for the ginger ganache... warmed up and spooned over a bowl of ice cream, it is simply divine - and an excellent way to soothe your bruised baker's ego.

Happy Bakings All - I wish you better results than I had this month!

20 February 2010

Sick day

The worst part of a sick day is the being sick part.

I went to sleep last night thinking of the different things I would like to bake today.  Sadly, this morning I woke to a sore throat and a headache.  Super.  I mustered enough energy to get dressed & gear up to head out with my hubby to walk the dogs.  Less than a block from the house I could tell the cold air & brisk pace was doing me no good.  Hubby could see this too, so he took Molly's leash from me and sent me home with a kiss.  So home I came and made him some coffee before curling up in bed with some magazines, a few cookbooks, the laptop and one of the (now) tired pups.  For myself, I put on a kettle of water to boil, squeezed some lemon juice into a mug and spooned up some ginger honey.  That should soothe my sore throat...

09 February 2010

Gifts from the Tropics & Ginger Cream Scones

On Sunday, my parents returned from their annual holiday in Hawaii.  Every winter for more than 20 years now, they leave the cold, bleak winters of Alberta for a month of sun and sand in Oahu.  I can only imagine how difficult it must be some years, to leave the ocean and warm breezes of Hawaii and return to bundling up in layers and shoveling snow until spring arrives.  I would hope that the month of reprieve from the cold makes the last few months of winter that much easier to bear.


When she returned home this year, my mom brought me a few little treats in the form of flavourful syrups.  Hawaiian Ginger syrup, Thai Ginger syrup and Coconut syrup - tasty treats for me to play with in the kitchen.  Perhaps I should have waited a few days for my Rice Pudding experiment - guess I'll just have to try again and see if I can improve the results - but that will have to wait for another day.  Being short on time this morning, I decided to try out one of my new ingredients in a much quicker recipe...


Cream Scones are incredibly simple to make and taste like home.  A friend made these for us when we arrived in London for a visit, served up with strawberry jam and double cream (the likes of which I have yet to taste again outside of the UK).  I myself make these at least once a month and enjoy them with a nice hot cup of coffee on a Saturday or Sunday morning.  Omit the ginger and you have a simple biscuit that is still elegant enough to be served as dessert, split open and served with fresh berries and softly whipped cream.  Add some dried currants or cranberries to the dough and you won't need a thing to serve with them, they're delicious and flavourful.  The trick is to work the dough as little as possible once you add the cream and you will be rewarded with scones that are light and fluffy and delectable.  Overwork that dough and you'll end up with something you should probably use as a door-stop.  In this case, the candied ginger makes them as much a treat as any cookie would be.


Ginger Cream  Scones
(makes 8 scones)


2 Cups (284 g) all-purpose flour
1 Tbsp (16 g) baking powder
3 Tbsp (45 g) sugar
1/2 tsp salt
1/3 Cup (60 g) crystallized ginger, minced
5 Tbsp (71 g) unsalted butter, cold and cut into small pieces
1 Cup (240 ml) heavy cream
1 tsp vanilla extract
    ~~~
3 Tbsp heavy cream
1 1/2 tsp ginger syrup
sugar


Directions:
1. Preheat oven to 425F and move rack to middle position in oven.
2. In the bowl of a food processor, (you can also make these by hand in a large bowl), blend together the flour, baking powder, sugar, salt and ginger.
3. Add in the butter pieces and blend with three or four 1-second pulses (or cut the butter in by hand as you would for pie dough).
4. Pour in the cream and vanilla and pulse three more times, until the cream is just barely incorporated into the flour mixture (you will still have some pockets of dry ingredients).
5. Turn the mixture out onto a clean countertop and gently knead by hand just until the dough comes together in one cohesive ball - remember not to overwork it!   Flatten the dough out into a rectangle or circle about 3/4 inch thick.  Cut into equal sized pieces and place them on a parchment-lined baking sheet, spacing them about 2 inches apart.
In a small bowl, mix together the 3 Tbsp cream and syrup.  Brush mixture onto each of the raw scones and then sprinkle them with sugar.  Place in oven for 11-15 minutes, until puffy and the tops are just golden brown around the edges.  Serve when still warm from the oven.


NOTE: Because these are so simple, they don't keep long.  If you wish to make a smaller batch, follow steps 1 through 3 as above.  Take half of the flour and butter mixture, cover and refrigerate for use at a later date.  This mixture will keep for up to 5 days.  To the remaining half of the mixture, add 1/2 Cup of cream and 1/2 tsp of vanilla and prepare as as directed.  Ditto for the "leftover" batch, when you are ready to make them.

04 February 2010

Coconut-Ginger Rice Pudding

A few months ago, I went to visit my sister in California.  It was a great visit, but then it always is.  We go shopping (naturally - we were practically raised in a mall!), we go get our nails done at the absolute best nail salon in Southern California, we hang out, do cool stuff and then we shop some more.  Since her husband was out of town during my last visit, I got to be her date for my nephew's football banquet at school.  It was a pot-luck event, and since I was going to be in town, she volunteered me to bring a dessert (naturally).  We had a good time, chatted with some of her friends and enjoyed watching my nephew be embarrassed by the whole evening - as were all the other 14-year olds on the team.  Checking out the lineup of desserts on the buffet, sis & I couldn't pass up the home-made rice pudding one of the mom's had brought.  After all, rice pudding is another one of our childhood fav's.  We headed back to the table, grabbed our spoons and dug in.  Immediately, our eyes locked as we tried to figure out what the heck that odd flavour was... it sure wasn't like any rice pudding we had ever tasted.  It tasted....uhhh....smokey...like cigarettes or something.  I know we live in a very food-saavy world these days, and chefs are always trying new things, testing new flavour combinations, but I am almost 100% positive that Wet Ashtray Rice Pudding is not going to be the hot new taste sensation that takes the country by storm.  Holy hell, it was bad.  One spoonful was enough and we were off to find some other dessert to kill the aftertaste.  The only thing I can think of is either a) they smoke a LOT in that house, or b) someone accidentally grabbed the bottle of liquid smoke instead of the vanilla.  Now we've all had at least one culinary disaster in our lives, but one thing I have learned is to always, ALWAYS, taste your product before you head out the door to serve it to 75 people.


That little incident nearly killed my love for rice pudding - it certainly made me avoid it for a while, but I've been itching to come up with a recipe for coconut rice pudding and I figure tonight's the night to get back on the proverbial horse and give it a try.  It turned out pretty good, especially for something I had no recipe for to begin with.  Hubby liked it, and I think my sis would too.  After all, the bar is set pretty low since the last time she had rice pudding.  Too bad she's too far away to be one of my tasters....


Julia's Coconut-Ginger Rice Pudding
Serves 4


4 Tbsp (60 g) ginger marmalade
1 Cup (240 ml) coconut milk
3 Tbsp (45 ml) heavy cream
2 Tbsp (30 g) sugar
1/2 tsp salt
1/2 tsp vanilla extract
1 tsp coconut extract
1/2 tsp fresh-squeezed lime juice
1 egg yolk
1/4 Cup unsweetened shredded coconut
1 Cup cooked rice (great use for left-overs, but I recommend using a starchy, short-grain rice like arborio)


In a large saucepan, over medium heat, melt the ginger marmalade.  Stir in the coconut milk, heavy cream, sugar & salt and heat, stirring occasionally until the mixture just starts to boil, then reduce the heat to low. Meanwhile, in a small bowl, use a fork to break up the egg yolk.  Take a few tablespoons of the coconut-ginger mixture, and slowly add it to the egg yolk, whisking continuously (you need to temper the egg before you add it to the mixture, or else you'll have scrambled eggs in your pudding and that's almost as gross as wet ashtray rice pudding).  Pour the tempered egg mixture into the saucepan, and cook over medium-low heat, stirring continuously until the mixture is slightly thickened, or temperature reads 175-180 degrees on an instant-read thermometer.  Remove pan from heat and stir in the vanilla and coconut extracts, as well as the lime juice.  Toss in the cooked rice, and stir well until all of the rice is coasted with the custard.   


In a small, non-stick skillet over medium-low heat, slowly toast the shredded coconut. Keep a close eye on this, and stir the coconut every minute or so, as it can burn quickly.  As soon as the coconut turns  golden brown, immediately remove it from the heat and add it to the rice pudding mixture in the saucepan.  Give the pudding a final stir, and spoon into small bowls or ramekins.  Chill in the fridge for 1-2 hours before serving.


Because this is a recipe that I completely made up in my head, I welcome any and all feedback you have to offer.  Give the recipe a try and let me know what you think. Enjoy!